
Contents
- 1 Step 1: Setup an account on Mailchimp. Go to www.mailchimp.com
- 2 Step 2: Create a list for your customer contacts and potential leads to start engaging
- 3 Step 3: Create a Sign Up form to send to your customers and contacts
- 3.1 Personalize your sign up form with your company logo, tag line and a brief description of what they are signing up for.
- 3.2 Add a date field or birthday field to your sign up form (optional).
- 3.3 Add the phone number field to your sign up form (optional).
- 3.4 Add the CASL consent request to your mailing list sign up.
- 3.5 This is how your form will appear to your clients.
- 4 Step 3: Start engaging your clients through your email newsletter. Get them to sign up.
A great way to stay in contact with your clients and future clients is to engage them through regular newsletters, company updates, offers, expertise, recipes, etc. In order to do this, you need to have a tool and a process that allows you to send these communications to your clients, or segments of your clients in a timely way.
The first step to starting to do a newsletter or mailing list is to find an easy to use platform, setup your account and setup your list. This blog will walk you through how to setup an account on Mailchimp, and the strategy for setting up your list.
We will walk you through how to setup your mailing list and get your sign up form ready to send to your customers. Future posts will include the next steps including sending your first newsletter/campaign, using automation, and understanding reports.
There are a couple of different free mailing list platforms available, Mailchimp and Aweber being two of the most popular. We use Mailchimp and see value in the features and tools it provides.
Step 1: Setup an account on Mailchimp. Go to www.mailchimp.com
Click on “Sign Up Free” in top right hand corner.

Fill in your information. You will then be prompted by email to activate your account. Click on the link to activate your account. Write down your Username and Password in a safe place.

Once you are logged in, you will see the Mailchimp Dashboard. We will walk you through these different components across our Mailchimp series.

Step 2: Create a list for your customer contacts and potential leads to start engaging
The first step when setting up your mailing list is to create a list. This is the list of contacts you will use to email out information about your business, a newsletter, personal invitations to events, etc.
When creating your list, we recommend you think through the types of clients you have. Do you have clients with diverse interests? What types of communications are you going to be sending out? How often. Write down the top 4 communications you want to send out and who you send them to. Is there a clear group that stands out that you communicate with the most often? If so, focus on that group for your first list.
In our experience, we have had success having one list for all of our customers and contacts and then grouping them so that you can send emails to a portion of the list or all of them. For example, at Hunch Manifest we have two lists. One that is for all of our customers and leads, and one that is for our advisory group. The list of our customer and leads has groups for each type of customer, and for those that are leads, we have them in the “newsletter” group. Creating a list this way allows you to send a campaign (think email) to the whole list, or specific emails to a portion of the list.
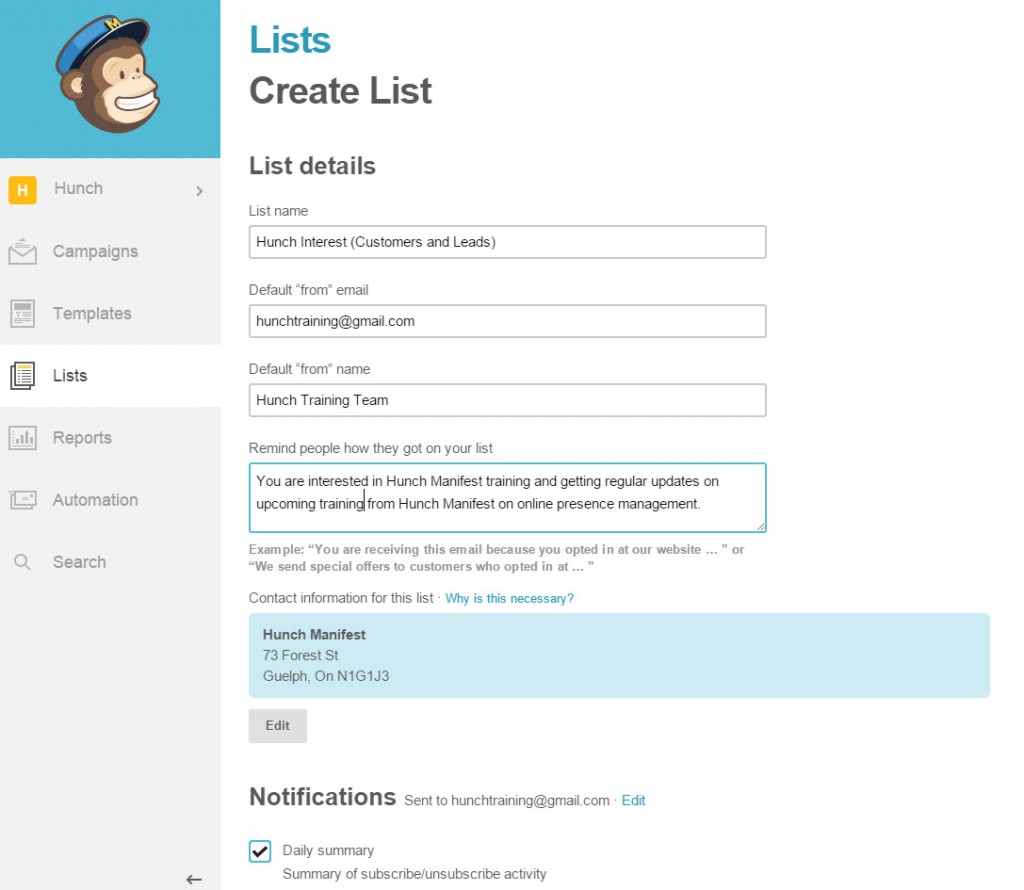
Click on Lists on the main dashboard.
Click on “Create List” on the top right hand side of your screen.

Enter your list information. Be specific in your list name so that if you have multiple lists in future it is easy to differentiate. Select “Daily Summary” so that you get updates on who has signed up for your list at the end of each day (you have signups). Click Save. This will be your primary list for sending out communications.

Step 3: Create a Sign Up form to send to your customers and contacts
In order to grow your list, you need to have a form where clients and potential clients can sign up. We will start by creating a sign up form that you can send to your current contacts (clients and potential clients). We will cover how to get sign ups on your website and social media in the future.
Make sure you are in the list you just created. You can do this by looking to see if you are in the “Lists” menu on the left and then the name of your list is at the top of the page. In this example, the list is called Hunch Interest(Customers and Leads). Then click on Sign up Forms on the top menu, and then click on General Forms.

Personalize your sign up form with your company logo, tag line and a brief description of what they are signing up for.
To begin, we recommend you add your logo and a brief description of what you are asking people to sign up for. To do this, we’ll start by adding a message/logo to the top of the form. Go to the section called “click to add message” and click on Edit.

A dialogue box will appear where you can add an image and text. To add an image, click on the icon with mountains (see below) and then add your desired text. You may have to save and close a couple of times and preview what it looks like to get it appearing the way you want to. Click “Save and Close” when you are done editing.

Here is an example of how we set our header up for our sign up form.

Add a date field or birthday field to your sign up form (optional).
By requesting a date or birthday field to your form you have the opportunity to send them something special for them on this date. You may ask them their founding date (company), birth date, or anniversary, etc. To add a birth date/date field you want the user/client to enter click on the Date field on the right hand side panel. If you don’t see the list of fields on the right hand side, click on “add a field” on the top right hand side of the list, highlighted in blue below.

Change the field label to describe what you are requesting. In this example we have called it Birthdate. Click on “Save Field. The field is now added.

Add the phone number field to your sign up form (optional).
If you want to have the clients phone number in your mailing list, add the Phone number field to your sign up for. You may want this so that if potential clients sign up, you can call them to offer a free consult. To add the Phone number field, click on the “Phone” field on the right hand side. If the panel on the right is not showing you the list, make sure you are on the “Add a field” tab at the top of the right panel (highlighted here in blue)

Select the second choice for number format. Click on “Save Field”. The field is now added. If you want to delete the field, click on Delete below the “Save Field” button.

Add the CASL consent request to your mailing list sign up.
If your business operates in Canada, you need to be aware of the new CASL (Anti spam legislation) and request consent for sending them messages, such as a newsletter. To do this, you can add a field in your sign up requesting their consent. To add a field to your sign up form for consent, click on Checkboxes from the right hand side menu.

When the menu comes up, change the field label to Consent and add the following content in the first option. “I agree to receive <your company name>’s newsletter containing news, updates and promotions.” If you plan on sending other information, include it in the list. You are limited by the number of characters you can use. Click on “Save Field” and this field will have been added.

This is how your form will appear to your clients.

You have now created your list, and created your sign up form. Now it is time to ask your customers to sign up. If you have previously got permission to send them emails, watch for our “how to import users” blog. To find the link for your sign up form, look at the top of page of the page you are still on. If you have navigated off of it. Click on Lists on the left hand side. Click on the list you want to send the sign up form for. Click on Sign up Forms from the top menu. Click on General forms. You should now see it at the top of the page.

Copy the link from the top of the page and insert it into an email invitation to your contacts. In a future task, we will show you how to embed the sign up form in your website.

URL to send to customers
You now have the ability to ask your clients to sign up for your newsletter. The next step will be to send out your first newsletter.